Concur F.A.Q.s
1. I am new to Concur so how do I log in? [top]
Your sign-in is the initial of your first
name, your full last name, and @mssco.com, all lower case.
Example: My name is Shelia
Whitaker
My sign in is: swhitaker@mssco.cm
The password is: welcome, all lower case.
2. What is allocating?
Allocating means to distribute an amount proportionately among two or more parties.
3. How do you allocate a meal? [top]
Example: If you and 2 or more MSS employees go to
dinner and the total of the meal is $100.00,
a. Choose
expense type: Meals (B, L, D).
b. Fill
in the date, purchase from, and the total amount of the meal (the boxes that
are left lined red). Click the allocate
button in the right corner of your screen. The below screen will appear:
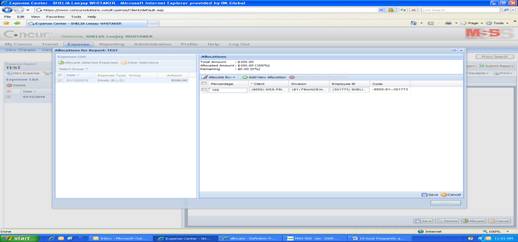
In the
allocation box, there is an allocate by drop down arrow,
c. Choose
allocate by percentage or amount.
d. Choose
the green tab which states Add New Allocation.
e. Click
inside employee ID box on the second line, start typing the first name of the
employee that you are allocating a portion of the meal to, and their name
should populate.
f. Click inside the division box which will drop
down the different divisions.
Click the client box which will drop down the different divisions. Once completed, click the save, and the done icon
will appear in the right corner of the screen.
If expense type comes up again, click cancel and click on your next
expense.
4. What is itemizing? [top]
To expense by detail.
5. When should I itemize? [top]
a. You
should itemize if your hotel stay is 2 or more days.
b. If
you entertained a guest that is not employed by MSS.
6. What steps should I take to itemize? [top]
Choose Expense Type- Entertainment, click add new attendee and the below screen should appear:
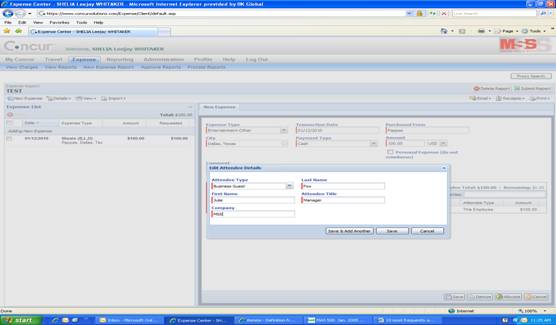
a. Fill
in the appropriate boxes (which are left lined red).
b. Click
save and add another attendee or click the save icon to complete your
itemization.
7. How do I expense my hotel stay? [top]
Choose Expense Type-Hotel, fill in the date, purchase from and the amount. (Put
in full amount on receipt).
Example: If your receipt states your total with tax is
$100.00 then that is the amount you will use.
Click the itemize icon in the right
corner and the below screen will appear:
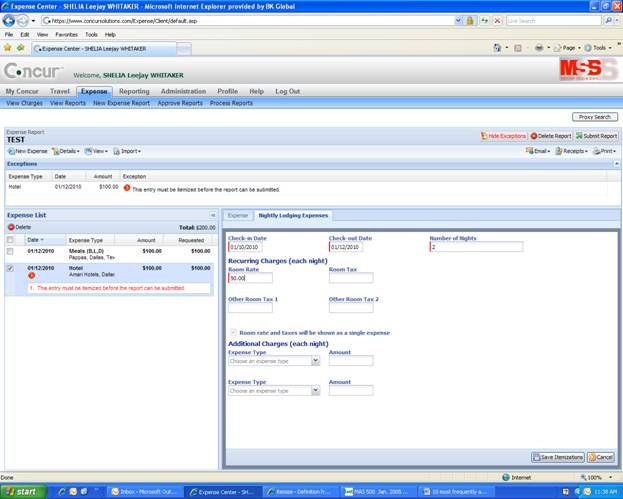
Fill in the requested information. Click save itemization and make sure the amount in the right top corner states $0.00. If there is a balance, your calculations were not done correctly.
8. What expense type would the allocation go under if I entertained a group of manufacturers that does not work for Military Sales & Service, Co.? [top]
Follow the same steps in number 3.
9. What is the difference between allocating and itemizing? [top]
a. Allocation
is used if expensing a meal for MSS employees.
b. Itemization
is use for hotel stays that are 2 or more days.
c. Itemization
is also used when the manufacturer is not employed by MSS.
When should I allocate or itemize?
You should allocate if you are taking a MSS
employee out to eat.
You should itemize your hotel stays and
when you take a manufacturer that does not work for MSS to dinner.
10. What do I need to do if I receive a message that there is no banking information on my account? [top]
Go to your profile: Go to the icon - Expense setting which is
along the right side of the screen, click bank information.
Fill in the routing
number account number and the type of account it is… saving or checking…etc.
11. What expense type should paper, ink and copies go under? [top]
Paper, ink and copies should expense under Expense type - Printing/Copy Cost
12. How do I attach my receipts? [top]
Once you have entered all your expenses, at the right corner of screen there is a icon titled Receipts which has a drop-down box. Within the drop down box, there is a tab that is called attach images, click it. You will then be allowed to browse for your receipts which you have scanned and saved on your computer, attach them and click the done icon.
Another option to send your receipts is underneath the Print button, which is located next to Receipts tab on the right of the screen. Click the Print button, within the drop down there is a tab called Template fax Receipt cover page. A cover page will appear. You need to print this page and fax your receipts to the number given which is 866-428-9026.
13. How can I view my receipts once submitted? [top]
Click the receipts tab again and you will see a tab called view receipts in a new window or in the same window, click it and your receipts will appear.
14. How often should I submit my expenses? [top]
You should submit your expense once a month at the end of month close.
15. How many months can I enter on one report? [top]
You may enter as many months as you would like per report, but you should submit your reports monthly. Going forward, you should have one month of expenses to report.
16. How do I expense my out-of-pocket cash expenses? [top]
Within the expense type window, put a check in the box labeled personal expense, do not reimburse. You would choose cash as the payment type.
17. How do I import my AMEX charges into my expense report? [top]
To import your AMEX expenses in to a new expense report, go to the Expenses icon at the top of the page, click it. In the drop-down of the Expense icon, there is a tab called New Expense Report, click it. You will then see a page that asks for the Report Header; enter the name of your report, click next when you are done. Click My Concur, which is at top left of the screen. On this page, your AMEX charges will appear under Available Company Charges. Put a check in the box located to the left of the screen above all the AMEX charges; this should put a check beside all the AMEX charges. There is icon that states Select Expense Report and it has s a drop down. Within the drop-down, select your report and click the green plus sign, which is called import, and all your charges will import into your expense report.
18. How do I check to see when my expense payment will hit my bank account? [top]
First off when you log into Concur you are going to click on the Expense Tab. This will bring up your current reports.
Click on the little “View” tab, it’s got a drop down box
where it lists all reports that you can view. Click on
“Approved Reports”. This will then show you all the reports that were
approved and extracted for payment.
Click on the report you wish to see.
Once you are in that report, you will click on that little
“Details” tab; this will also be a drop down box with a few options. You will
click on “Report Payments”.
This will then open a new window with the reimbursement
information for that report. The date that the payment should hit your account
is going to be located on the far left column and the amount will be on the far
right.
19. How do I delete an expense from a report…. personal or AMEX? [top]
Put a check in the box next to the expense
and click the red delete icon on the top left of the screen.
AMEX charges can be moved from the expense
report by deleting it, but it will reappear back under the Available Company
charges. AMEX charges cannot be deleted
from the system unless they are disputed and will need to be removed
administratively.
20. How do I bill a client for an expense? [top]
You will need to allocate the expense to its corresponding client. If the expense is not allocated, accounting will not know who to bill back and that expense will automatically get thrown into your personal samples account with the company.
NOTE: The “Client Bill Back” expense type is only to be used if that charge is to be billed back to a particular client, i.e., we will send out an invoice to that client to collect on that expense. Please do not choose the “client bill back” expense type for anything that would be considered an MSS expense.
21. When do I need to submit my expense report? [top]
The Expense Report Submission Policy is as follows:
If over $100, submit expense reports monthly.
If under $100, submit expense reports every 90 days or once a quarter.
22. What is the approval process for my expense report? [top]
Each expense report goes through a hierarchy approval process. The employee's next level of management approves the expense report. If after four calendar days the managers has not approved or rejected the expense report then it goes to their manager. After four calendar days of no activity it goes to their manager until it finally reaches the owners. This happens every four calendar days of non activity.
Example: When a Territory/ Account Manager submits an expense report, it goes to the Regional Manager for approval. If the Regional Manager does not approve the expense report in four calendar days, then it ges to FMD Director for approval. If the expense report is not approved in four calendar days by the FMD Director, then it goes to one of the Owners for approval.
If you have a USA bank account or PaySource card it will be paid by Concur (within 5 business days) once approved.
If you have an international account or no account then it will be paid upon the next payroll period.